Stone Profits Help Manual
  • Home
  • Intro
  • Presales
  • Purchases
  • Inventory
  • Sales
  • Accounting
    • Receivables
    • Payables
    • Banking
    • General Ledger
  • Reports
  • Schedule
  • Contact Us
  • Home
  • Intro
  • Presales
  • Purchases
  • Inventory
  • Sales
  • Accounting
    • Receivables
    • Payables
    • Banking
    • General Ledger
  • Reports
  • Schedule
  • Contact Us
Stone Profits Help Manual

SPS EMAILING SETUP IN GMAIL

 
Follow the guidelines below to set up email functionality through SPS when your company uses Gmail as an emailing platform.

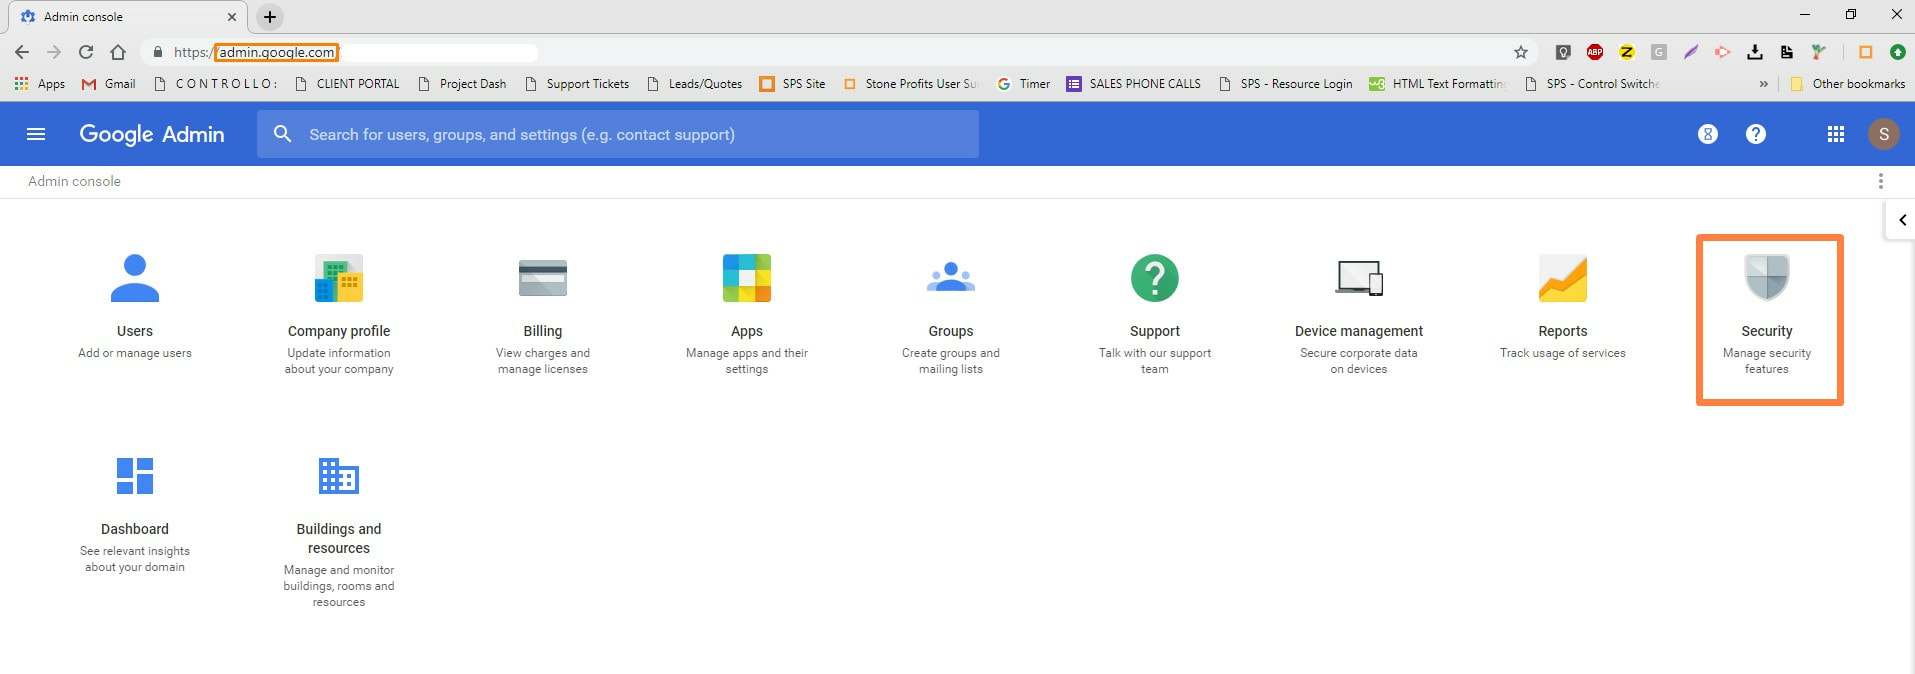
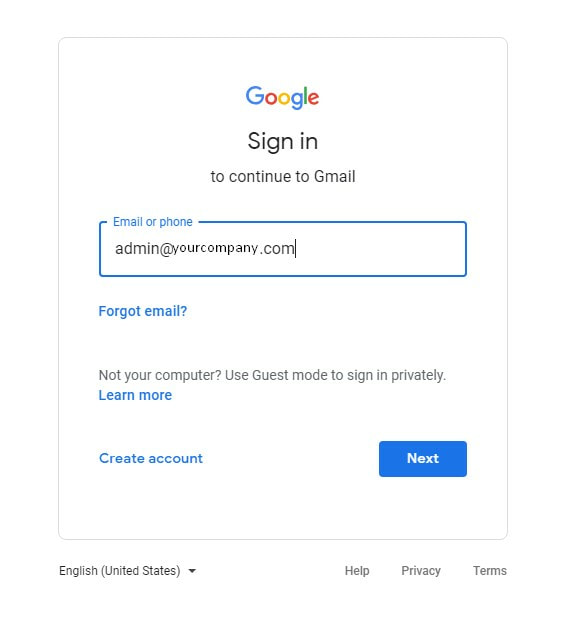
Go to admin.google.com and log into the administrator account for your company's emails.
Picture

STEP 1:
​SET UP A NEW USER
After logging in to your Google admin account, you should see your admin menu on admin.google.com.

Click "Users" from the menu.
Picture


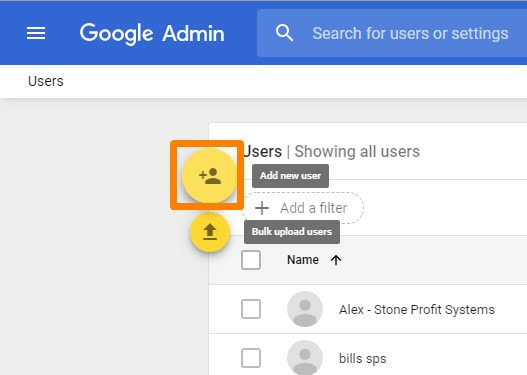
Add a new email account to your company that will be used as the outgoing email account for emails from your system. ​
Picture


​

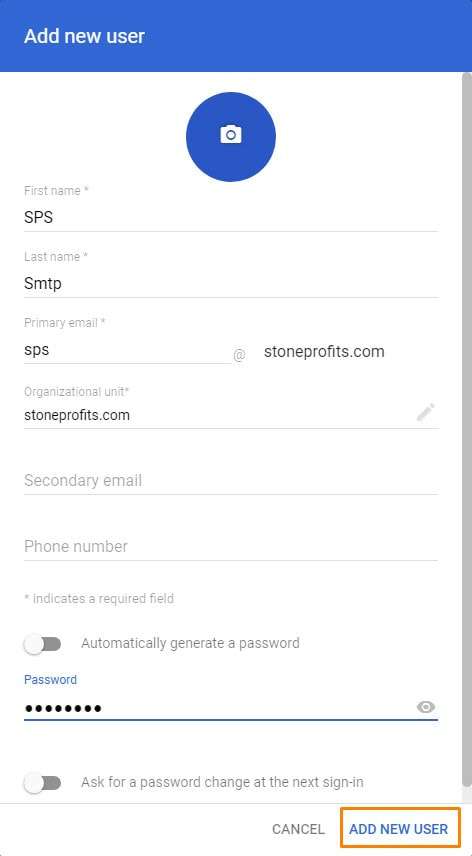
Enter the information for the new email account. Please use "sps" as a prefix for the email account (example: [email protected])
Picture

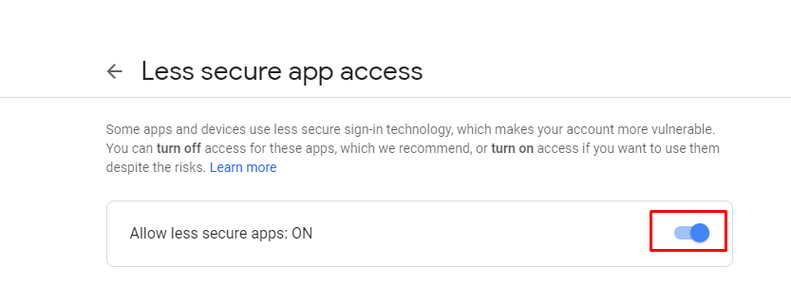
​ENABLE SECURITY SETTINGS
​Login to your email account and click on below link
https://myaccount.google.com/lesssecureapps​
Picture
​​


Or If you want to allow it for all users in the email domain follow below steps:
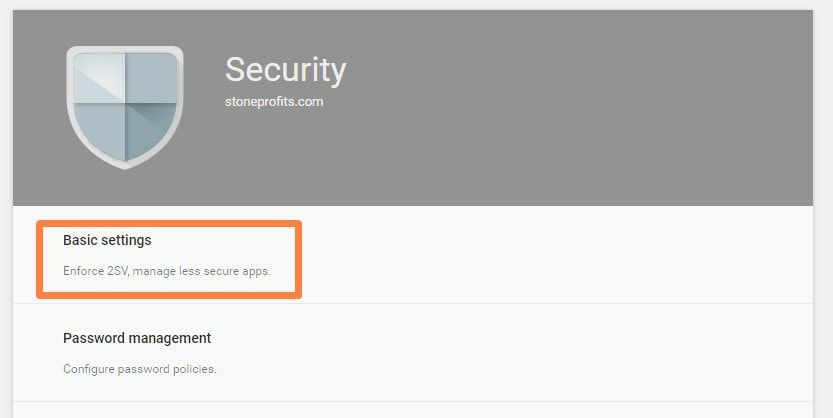
Click "Security" from your Admin menu

Picture


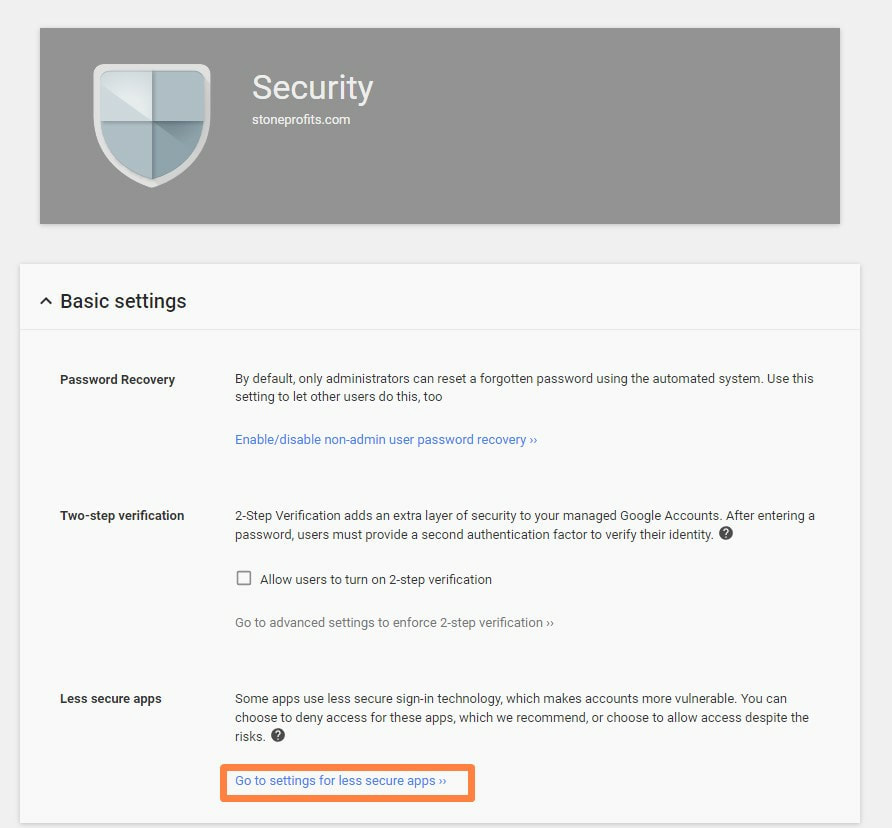
Click on "Basic Settings" under Security, then click the link "Go to settings for less secure app >>"
Picture
Picture


Ensure this setting is selected to "Allow users to manage their access to less secure apps"
Picture


STEP 2: 
​ADD EMAILS TO YOUR LIST OF "SEND AS" ACCOUNTS
This step is optional. If you do not want to go through the steps of adding each individual employees' email address to the list described below, ALL emails sent from SPS will show the reply address being the newly created email account from the first steps outlined above. This is not recommended if your customers will need to reply directly to specific users at your company.


Go to mail.google.com and log into the new email account you've created for emailing SPS([email protected]). 
​From your Gmail page, click the gear icon on the top-right of the page to click "Settings"
Picture
Picture

​

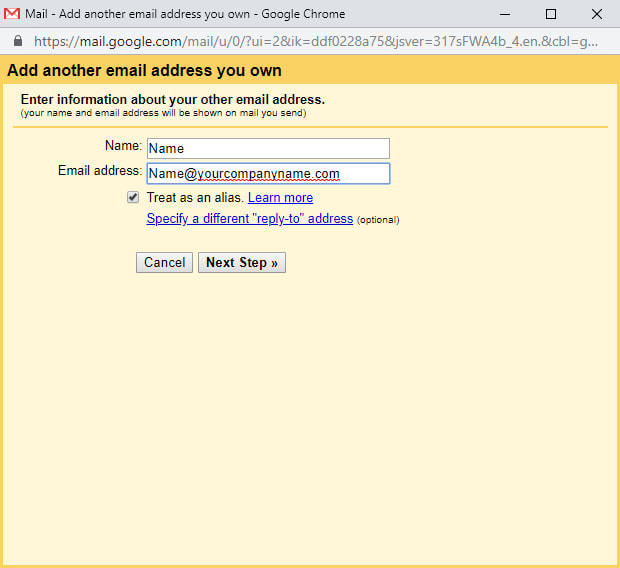
​In the "Accounts" sub-menu of your settings, click "Add Another Email Address" to add an email account that will send emails from SPS.

A.) The name/email entered here will be the reply address the customer will see when the specified user sends emails from the system. Enter the Name/Email Address, then click "Next Step"to continue.​
Picture


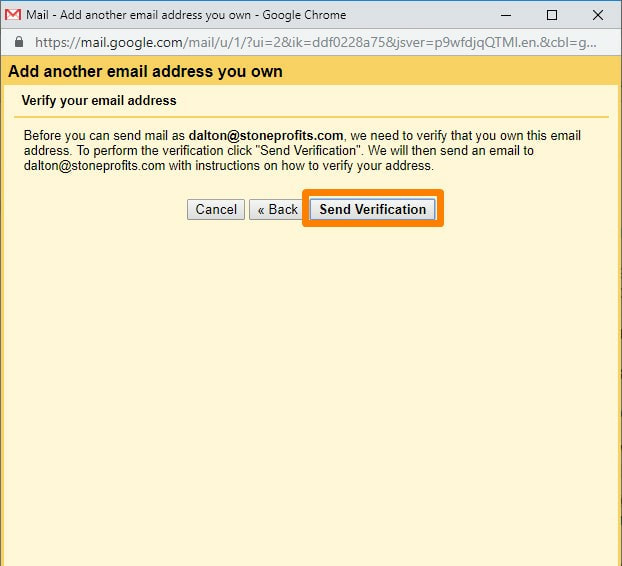
B.) Click "Send Verification" to email a verification code to the specified email address.
Picture
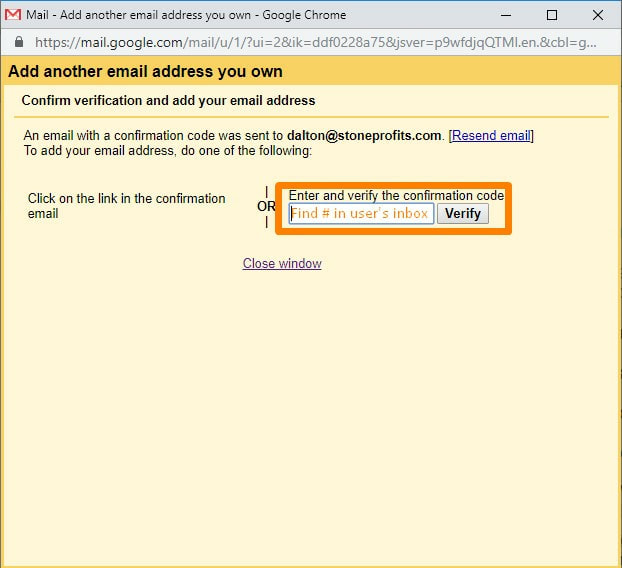
C.) Log into the email account to be verified and enter the code from the verification email into the textbox, then click "Verify" to finalize the changes.
​​
Picture


You will need to repeat the above 3 steps for ALL USERS who will need to be shown as the reply to address in emails sent from SPS.


ADD YOUR OUTGOING EMAIL SETTINGS TO YOUR SYSTEM
To add the SMTP settings to your system, go to your company's Stone Profit System.
*The URL for your system is unique to your company. It's usually something like abccompany.stoneprofits.com, xyzcompany.stoneprofits.com, etc.
Picture


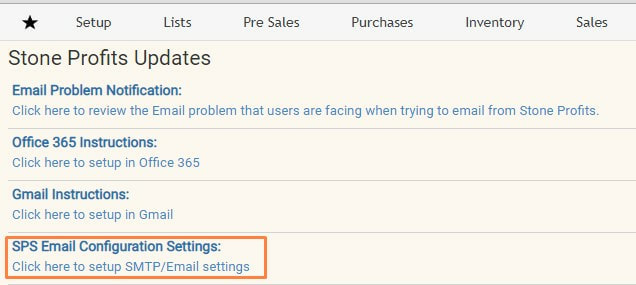
From this page, click into the "SPS Email Configuration Settings:"
Picture

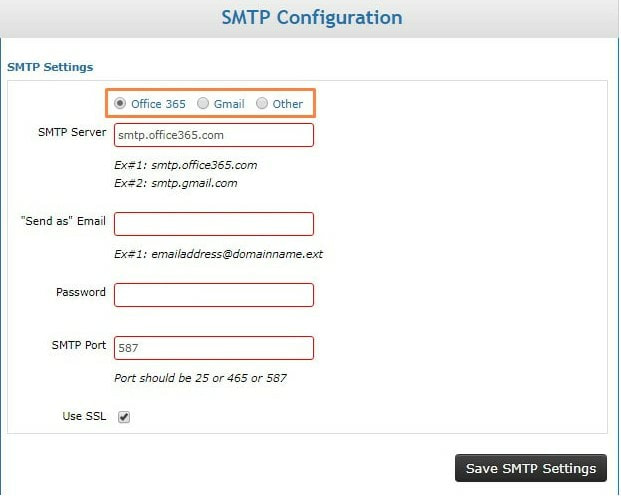
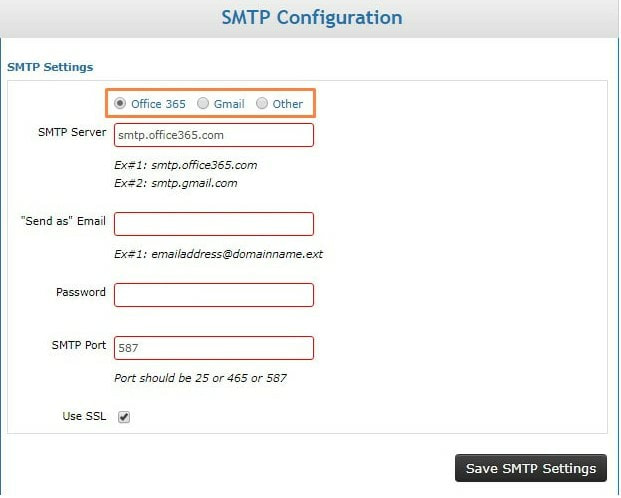
Select your email service provider from the options at the top of this page, then add the username/password for the email account you created for SPS.

Click the "Save SMTP Settings" button to save your settings.
Picture


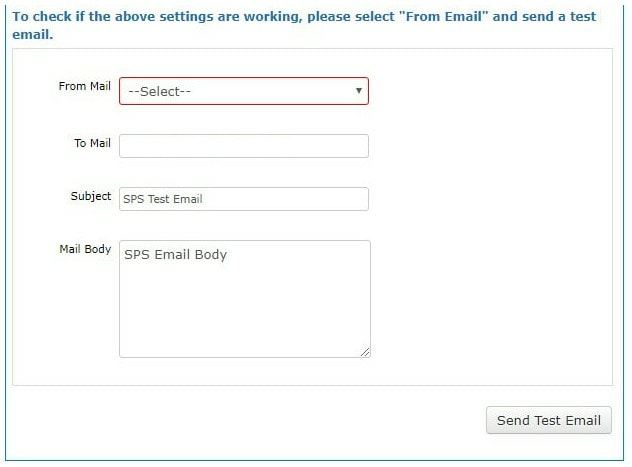
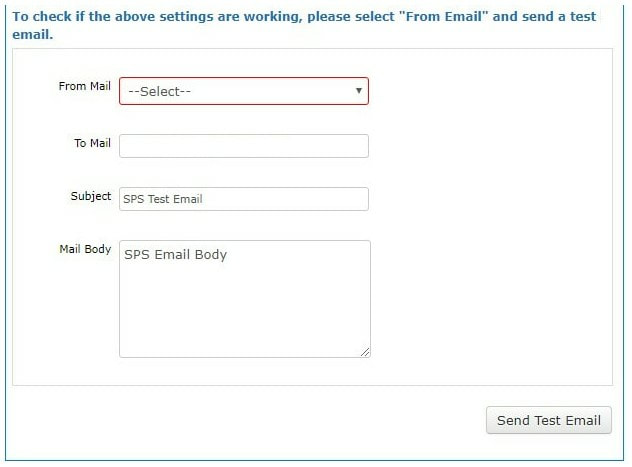
You can send a test email to yourself using the area below. ​
Picture


A pop-up will notify you whether the email was sent. 

- If no pop-up appears, make sure pop-ups are not being blocked (walk-through article here).
- If you receive an error message, please re-check the steps above to make sure everything is set up correctly, then try again.
Picture

SMTP SETTINGS IN OFFICE 365

 
Follow the guidelines below to set up email functionality through SPS when your company uses Office 365 as an emailing platform.


SET UP AN EMAIL ACCOUNT FOR SPS

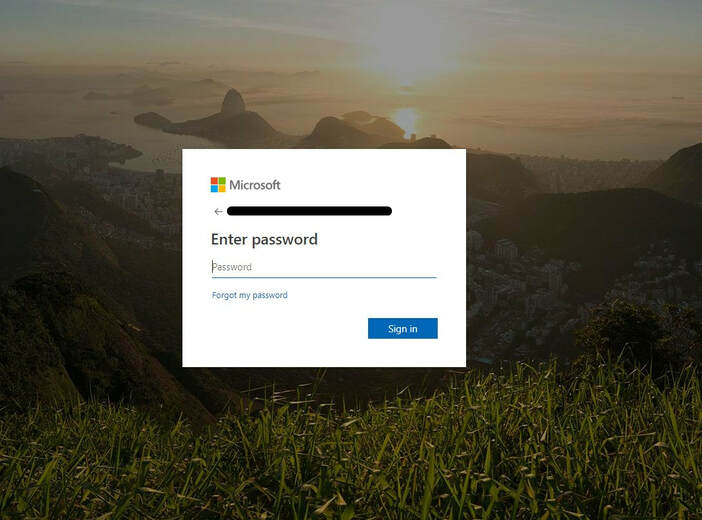
Go to login.microsoftonline.com and log in to the administrator account for your company's emails.
Picture
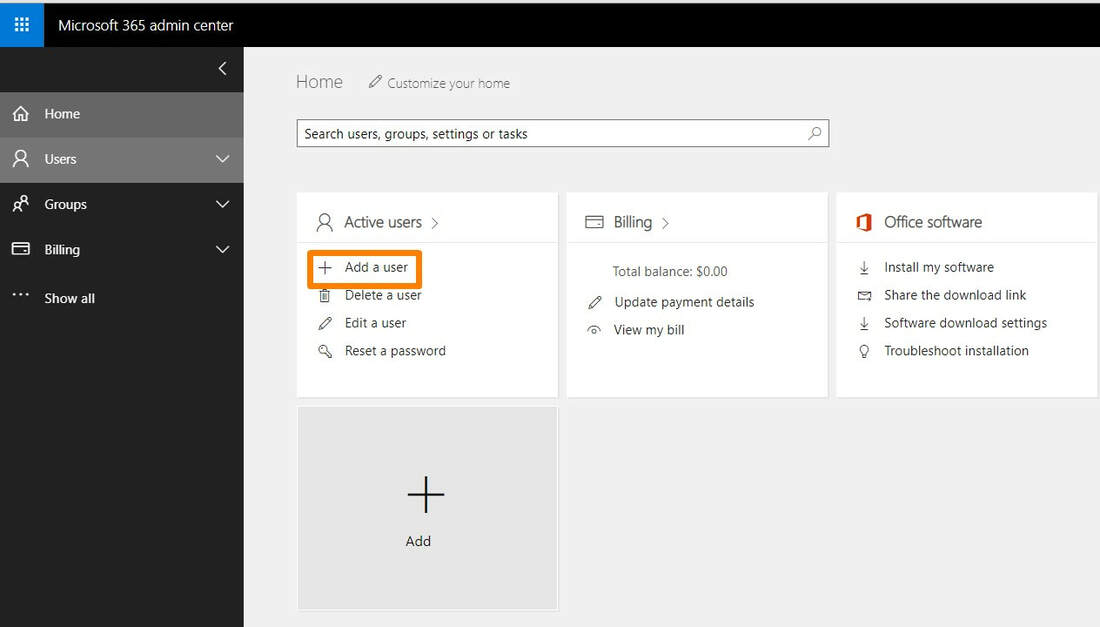
Click the Admin icon on the first page.
Picture


From the Home page, click to Add a user.
Picture


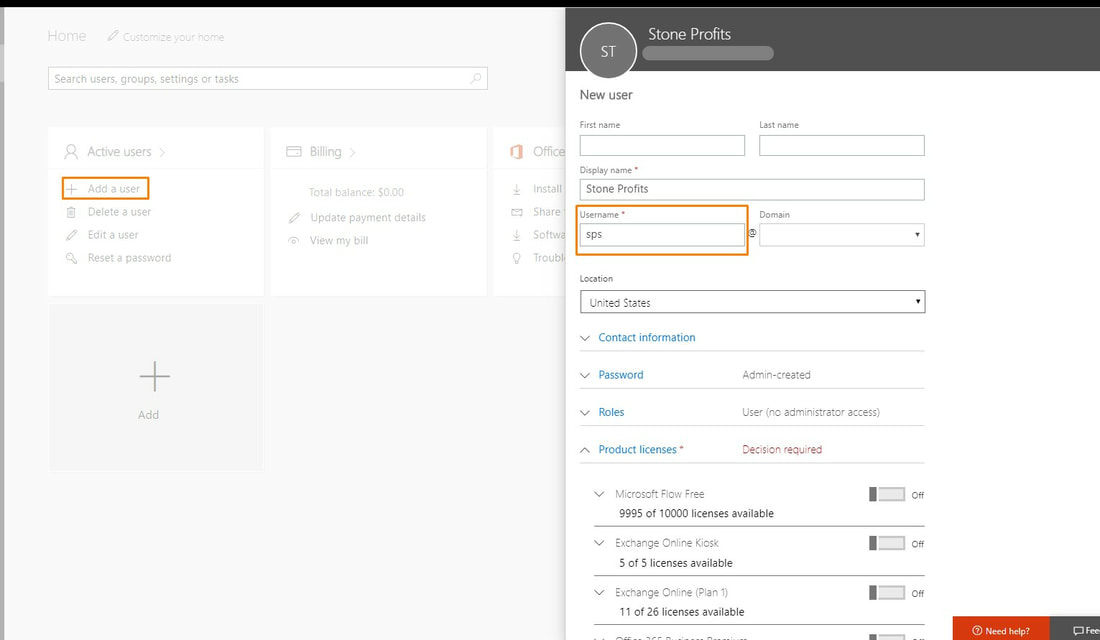
We need to set up a new email account to be used with Stone Profits. 
Please use SPS as the username (pictured below)
Picture


CONFIGURE YOUR OFFICE 365 SETTINGS

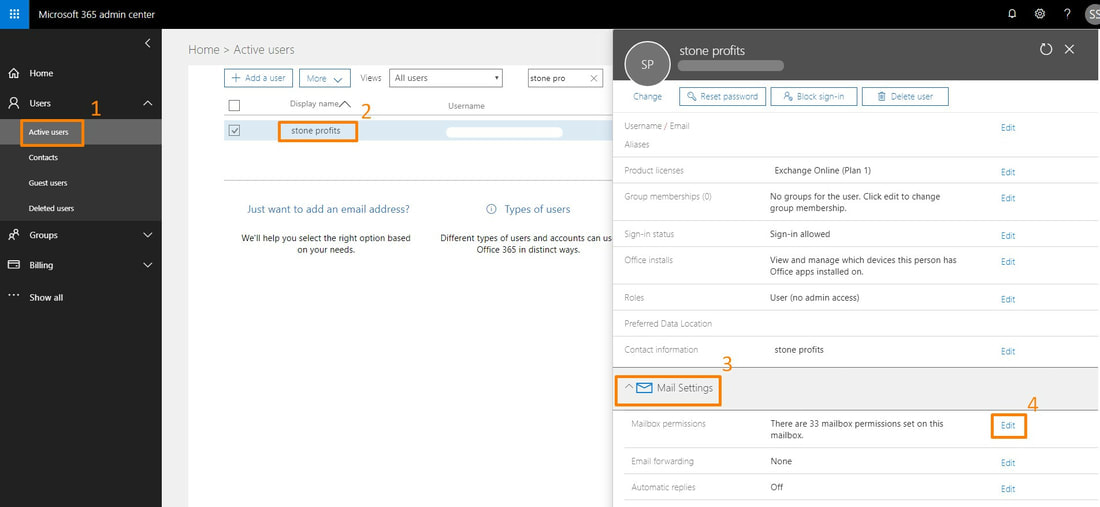
Get to the user settings and edit mailbox permissions by clicking...
1.) Active Users
2.) The newly created username ([email protected])
3.) Mail Settings
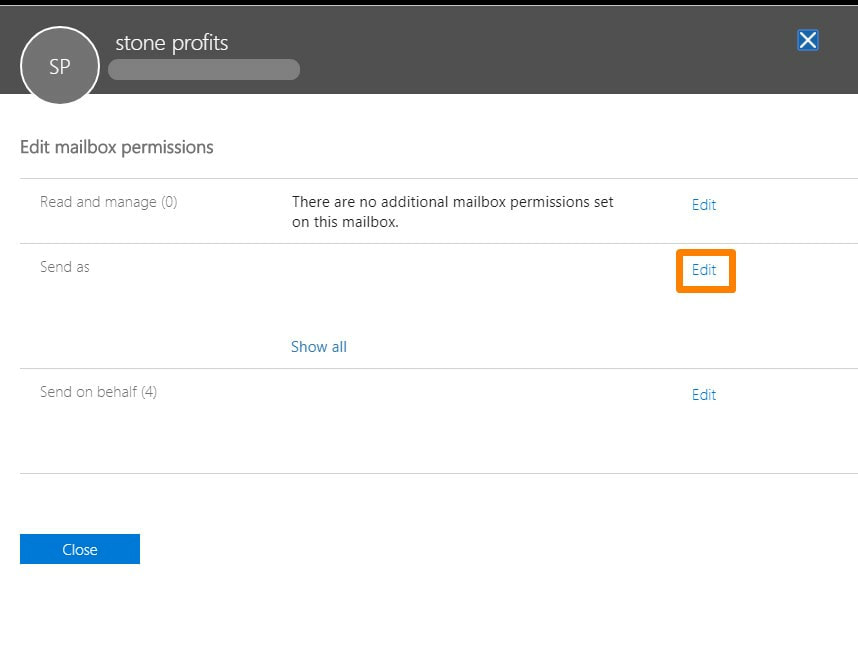
4.) Edit Mailbox Permissions
Picture


Edit the list of "Send As" usernames.
Picture


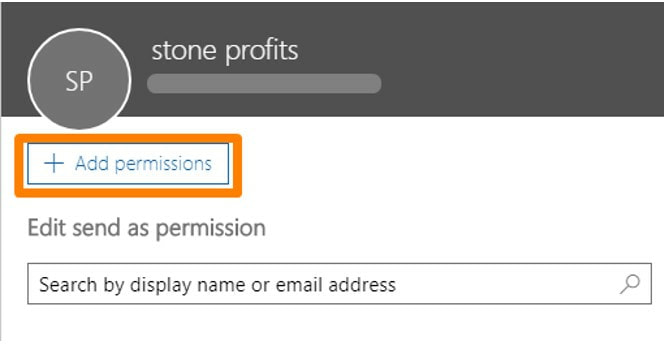
Click to Add Permissions.
Picture


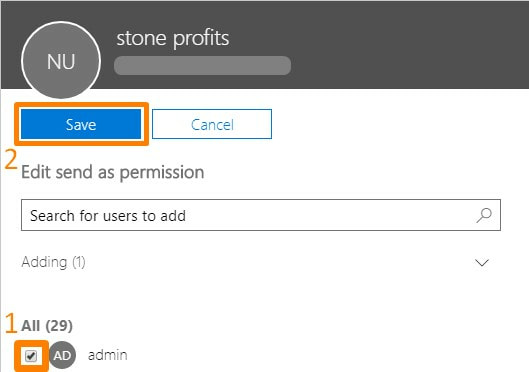
Select all users at your company who will be emailing from Stone Profit Systems. Save to finalize the changes.
Picture


If you experience issues saving the "Send As Permissions" in Office 365, try to log out and back into your email adminstrator account and try once more.

You can test your SPS email functionality by opening any printout (Sales Order, Purchase Order, Quote, etc.) and emailing it to yourself. ​


ADD YOUR OUTGOING EMAIL SETTINGS TO YOUR SYSTEM

​
​To add the SMTP settings to your system, go to your company's Stone Profit System.

*The URL for your system is unique to your company. It's usually something like abccompany.stoneprofits.com, xyzcompany.stoneprofits.com, etc.
Picture


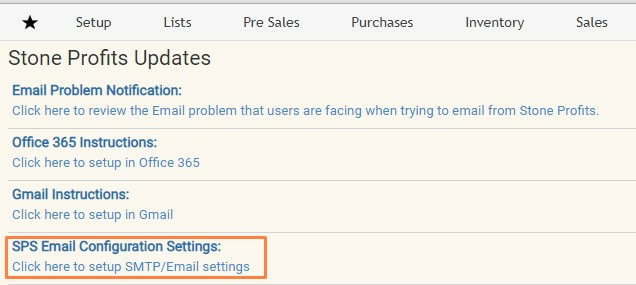
From this page, click into the "SPS Email Configuration Settings:"
Picture


​Select your email service provider from the options at the top of this page, then add the username/password for the email account you created for SPS. 

Click the "Save SMTP Settings" button to save your settings.
Picture

​You can send a test email to yourself using the area below. ​
Picture


​A pop-up will notify you whether the email was sent. 

- If no pop-up appears, make sure pop-ups are not being blocked (walk-through article here).
- If you receive an error message, please re-check the steps above to make sure everything is set up correctly, then try again.
Picture

NEW QUOTE & SALES ORDER INTERFACE

 
Picture

​Having trouble seeing the video? Try increasing the resolution to reduce blur.

Note: The video may need a longer time to load due when increasing the resolution.
CUSTOM TRANSACTION FORMS

 
Picture
 
    Custom Transaction Forms  module is used to configure the forms used in the Sale Order / Job and Quote Transactions
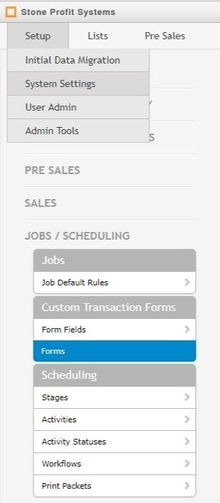
​     To access this module please navigate to the Setup >> System Settings >> Jobs / Scheduling
        
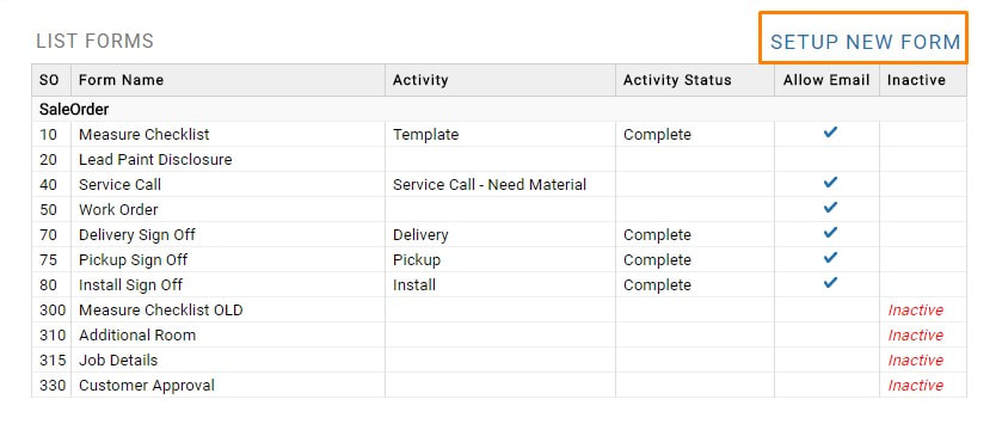
 Setup New Form
               . Add Form Header
               . Add Sale Order Header Fields
               . Add Sale Order Line Fields       
               . Add Schedule Fields
               . Add Text
               . Add Signature
List Forms
                 . Update Form
               . Duplicate Form
               . Make Active / Inactive Form
               . Delete Form


    ​

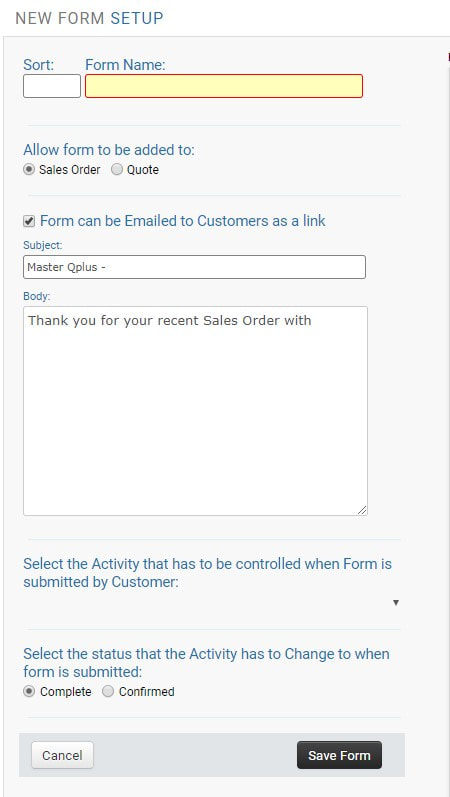
SET UP NEW FORM
Picture
Picture
   

Sort - Sequence of the forms to be ordered
Form Name -  Name of the form to be used to identified
​

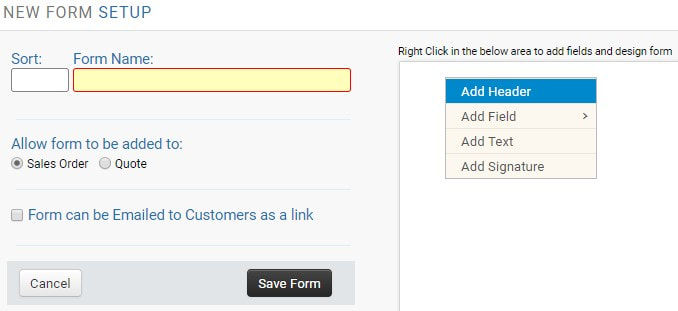
HOW TO ADD FORM HEADER
Picture
Right Click to get options menu

Add Header - Takes you to default header screen.

Add Field - To add custom field to a form.

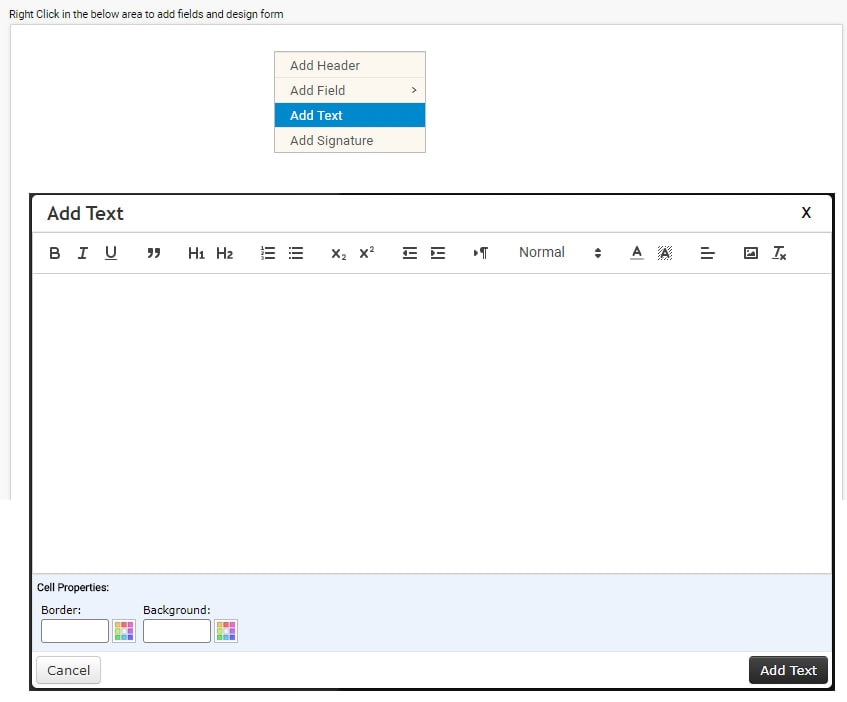
Add Text -  To add text content.

​Add Signature - Takes you signature screen.
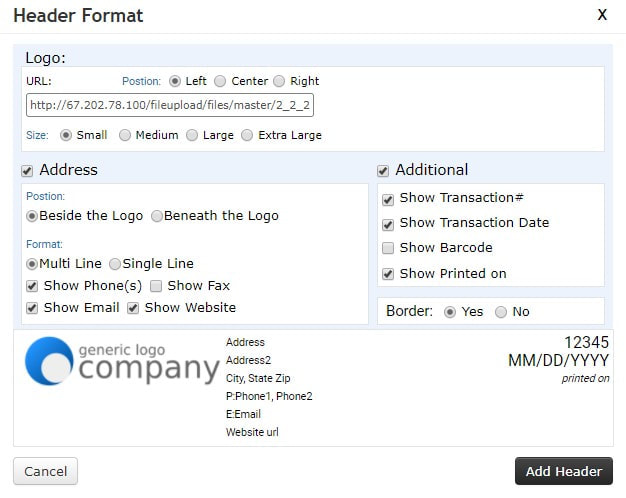
  ADDING HEADER FROM ADD HEADER
Picture
URL - Logo picture path.

Position - Log alignment in form.

Size - Logo picture size. 

Address - Company address with position alignment and format.

Additional
  1. Transaction# - Job / Quote number
  2. Transaction Date - Job / Quote date
  3. Barcode - Job / Quote Number as barcode.
  4. Printed on - Form Printed date.
Picture

  ADDING HEADER FORM ADD TEXT
Picture

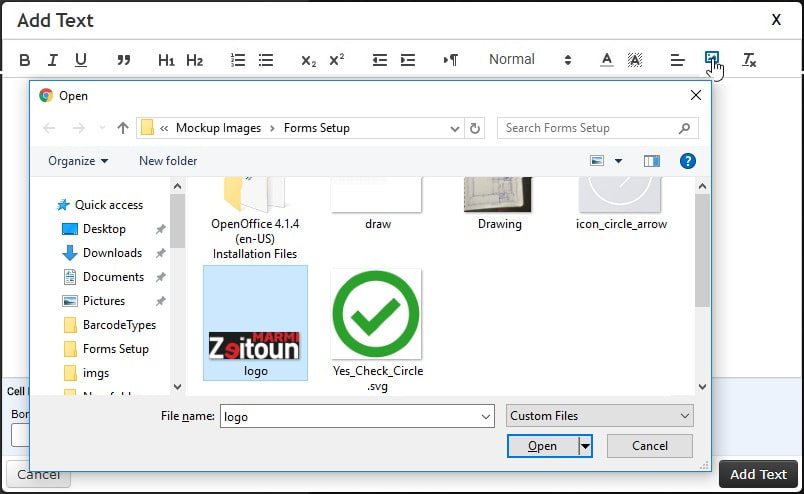
  ADDING IMAGE IN TEXT
Picture

  ADDING NEW ELEMENT IN SAME ROW
​          Right click on the row select Add Text enter the text in editor and save it.
Picture
​
          Now element will add next to current element like following.
Picture

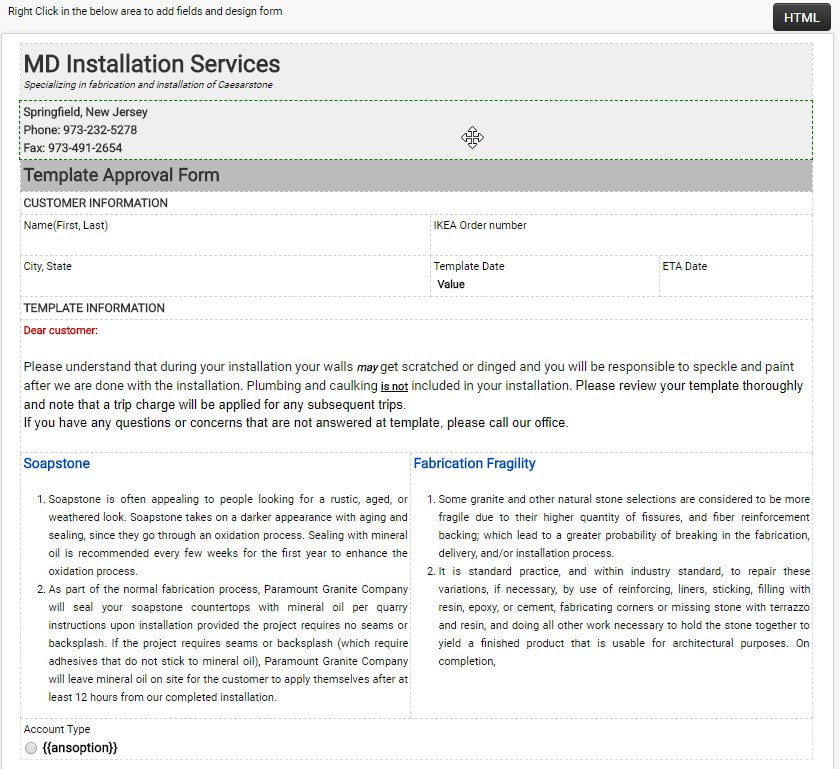
  DRAG AND DROP ELEMENTS
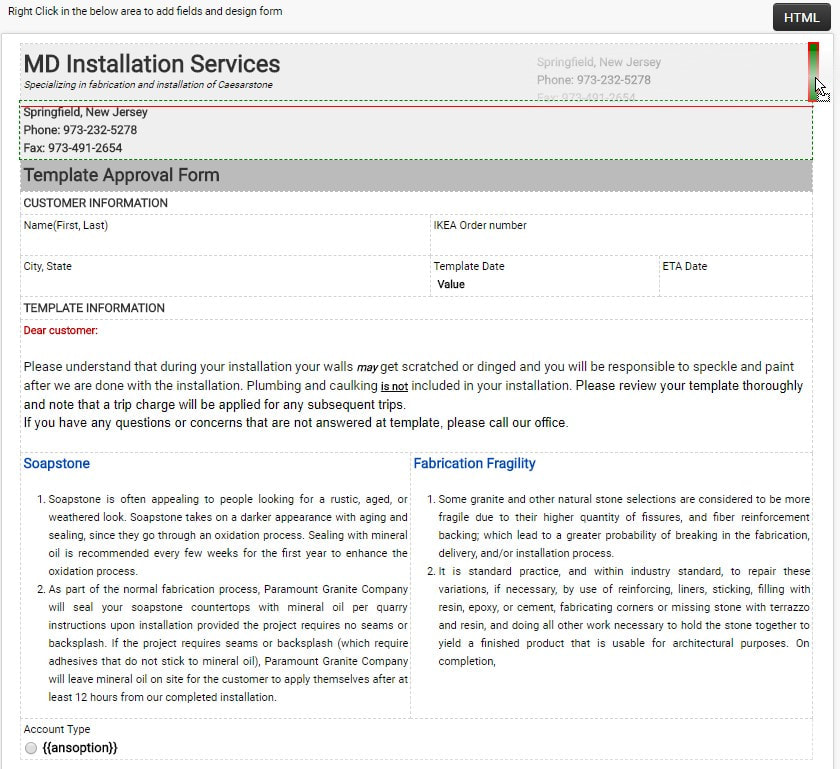
          Keep cursor on the element which you want drag and click + Hold then move the cursor to where you want drop.
Picture

​          After Highlighting like following image release the click to drop that element.
Picture

​         Now both the elements are in same line like in following image.
Picture

FAVORITES TOOLBAR

 
Picture
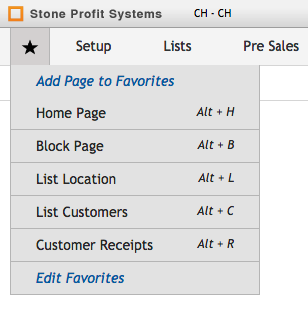
A new "Favorites" feature is due for release to all systems. This will allow for saving your most commonly visited pages to a list for easy reference. Shortkeys (hotkeys) can also be assigned to each favorited page. Each user will have their own list of favorited pages.
Picture


​ADDING PAGES TO YOUR FAVORITES LIST
To add to your list of favorited SPS pages, begin by navigating to the page you want to add.

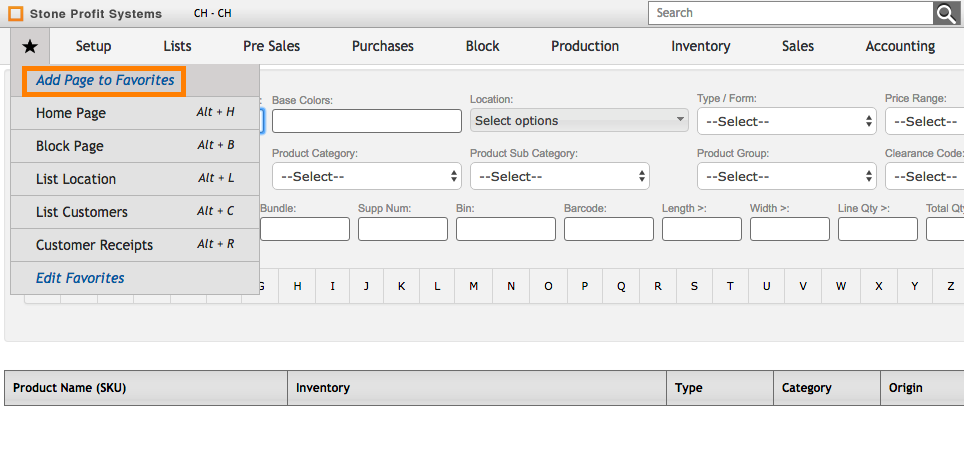
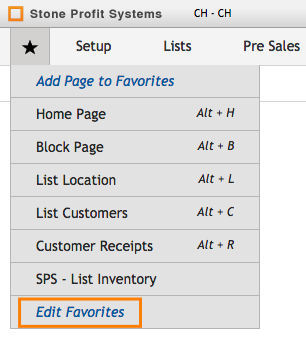
Once you are viewing the page you want to add to your favorites, click the star icon on the top-left of your screen, and then click the option to "Add Page to Favorites" to save the page.
Picture

CHANGING FAVORITE PAGE NAMES / ADDING SHORTKEYS
Picture

​
​After you have added a page to your favorites toolbar, it will appear in the list with a default name given from SPS.

If you want to change the name to make it more easily recognizable, click "Edit Favorites" to view/edit your list of favorites.
On this page, you have various options for editing your list of favorites.
Picture

1.) Sequence: This column dictates the ordering of your favorited pages. The pages with lower numbers in the sequence will show on the top in descending order.

2.) Label: The name of each favorited page can be changed here by clicking into the text box and over-writing the current label. 

3.) Short Key: One character from your keyboard can be typed here to be combined with the ALT key as a quick way to pull up a favorited page without clicking your mouse.

4.) URL: This is the direct web address of the page listed in your favorites.

5.) X: clicking the red X will remove a favorite from your list.

Click the button labeled "Save Changes" to finalize the changes you've made to your favorites. ​


USING SHORTKEYS


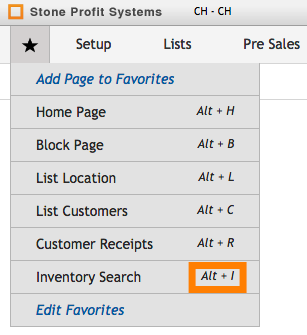
Using an assigned shortkey requires pressing the ALT key on your keyboard AND the other key you assigned at the SAME TIME. 

​​You will need to have Stone Profits pulled up on your browser for the shortkeys to take you to the desired SPS page.
Picture


​
​For example, if you had the Inventory Search saved with the Shortkey Alt + I, you would press down the keys highlighted in the graphic below simultaneously while in your system.
Picture

UPDATE: EDITING INVOICES W/ PAYMENTS

 
Due to popular request, invoices will now be opened up for editing after application of payments. ​
Picture
​
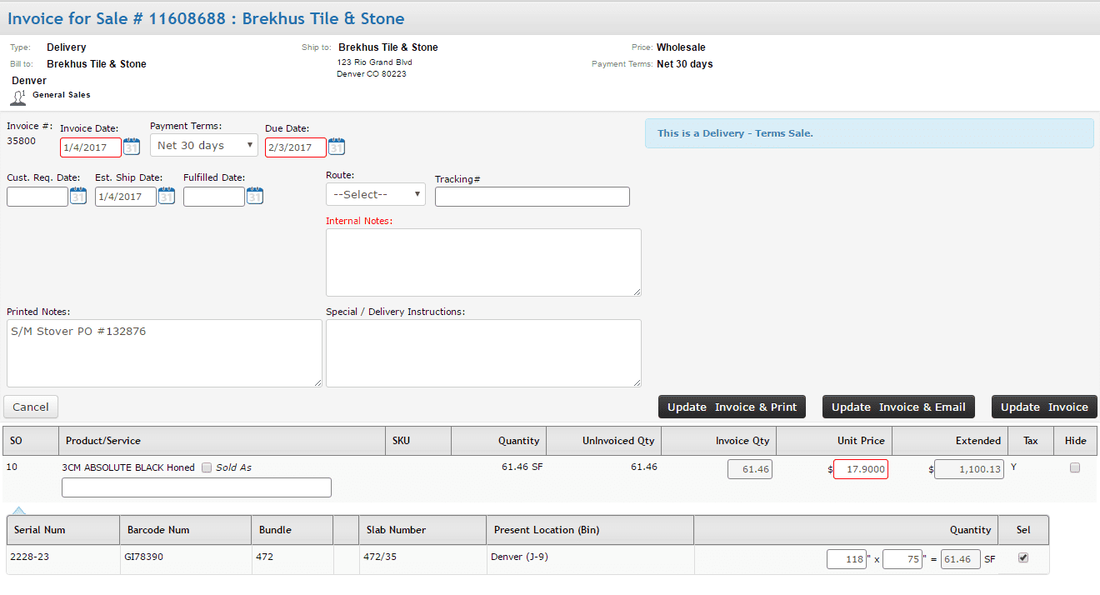
Previously, invoices were locked from editing after applying payments to them. Now, you'll have the ability to change all fields which were editable on the invoice before the payment. From the invoice detail page, simply hit the edit "pencil" on the top right to edit the invoice contents.

The available updates to invoices include...

  • Changing slab dimensions
  • Updating unit prices
  • De-selecting invoiced inventory items
  • Adding a description or "Sold as" name.
  • Changing Payment terms, Invoice Date & Due Date
  • Adding additional charges (services) to the invoice
​

Picture

IMPACTS OF THIS UPDATE:
  • Closing accounting periods will still disable edits of invoices.
  • If the period is open, changes made to an existing invoice will update the pre-existing journal entry made from the invoice; it will not make a new entry. 
  • If an invoice is fully paid and the amount due on the invoice is reduced from an edit, the remaining balance will sit as an unapplied amount on the customer's receipt. 
  • If a fully paid invoice's amount due is increased from an edit, the invoice will show up again in open AR. 
  • Users who should not edit invoices after payments can be restricted from editing invoices per their user group's permissions. 

OUTWARD CONSIGNMENT INVENTORY MANAGEMENT

 
NOTE: The outward consignment module is an add-on module in Stone Profits. Please contact our sales office for more info about pricing.
Picture

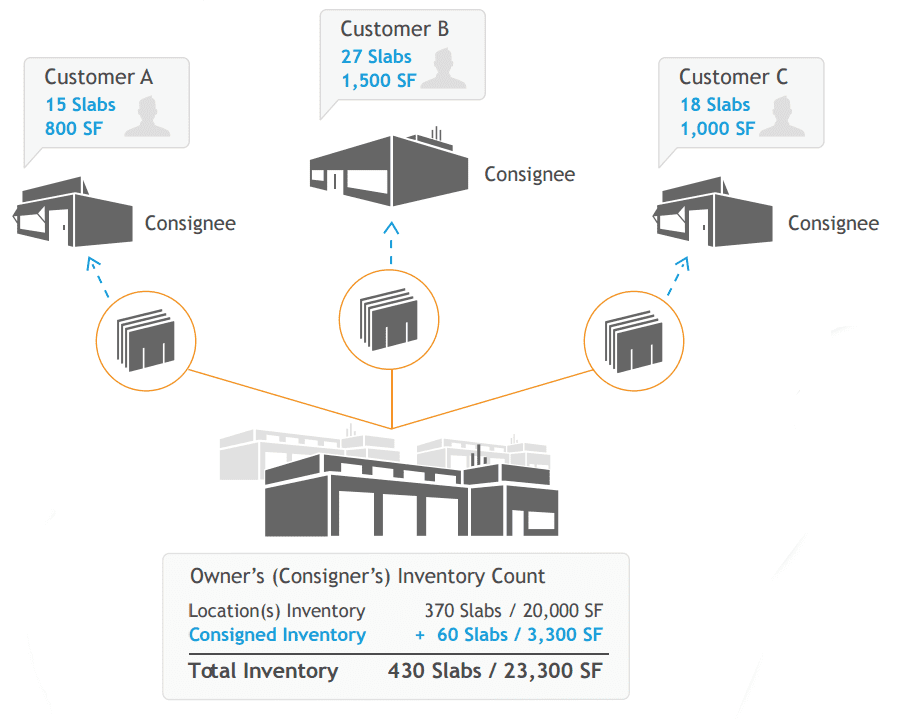
Outward consignment inventory are the items sent to your customers' locations to be sold. You would not receieve payment from your customer for these items until after they are sold. The process is outlined below: 

1.) Transfer the consignment inventory items from your company location to the desired consignment location. After completion of the transfer, these items will listed in BLUE TEXT. They will be unavailable for sale to anyone other than the customer who possesses the inventory unless transferred back. 

2.) Receive a list of consumed (sold) consignment items from your customer. 

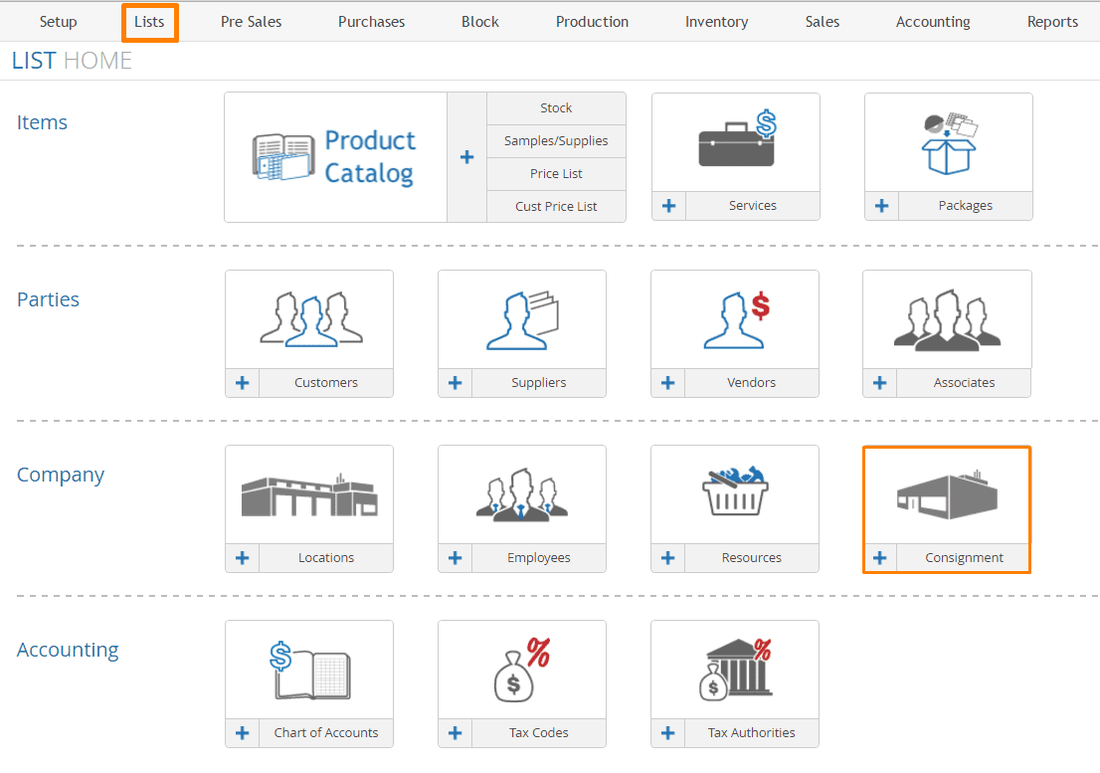
3.) Click "Consignment" in the list home to view your consignment customers. ​
Picture

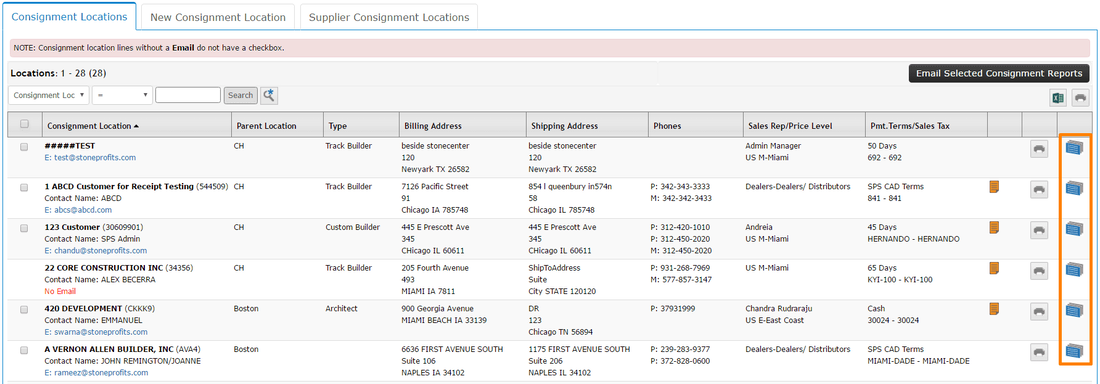
4.) Click the blue slab icon parallel to the consignment customer you wish to invoice for sold items. ​
Picture

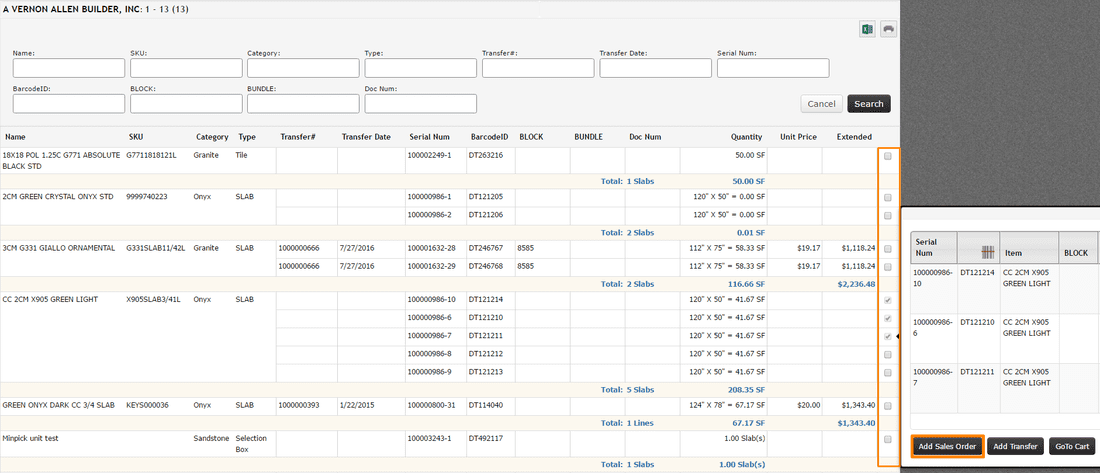
5.) Use the checkboxes to select which items have been sold, and then click "Add Sales Order"
Picture


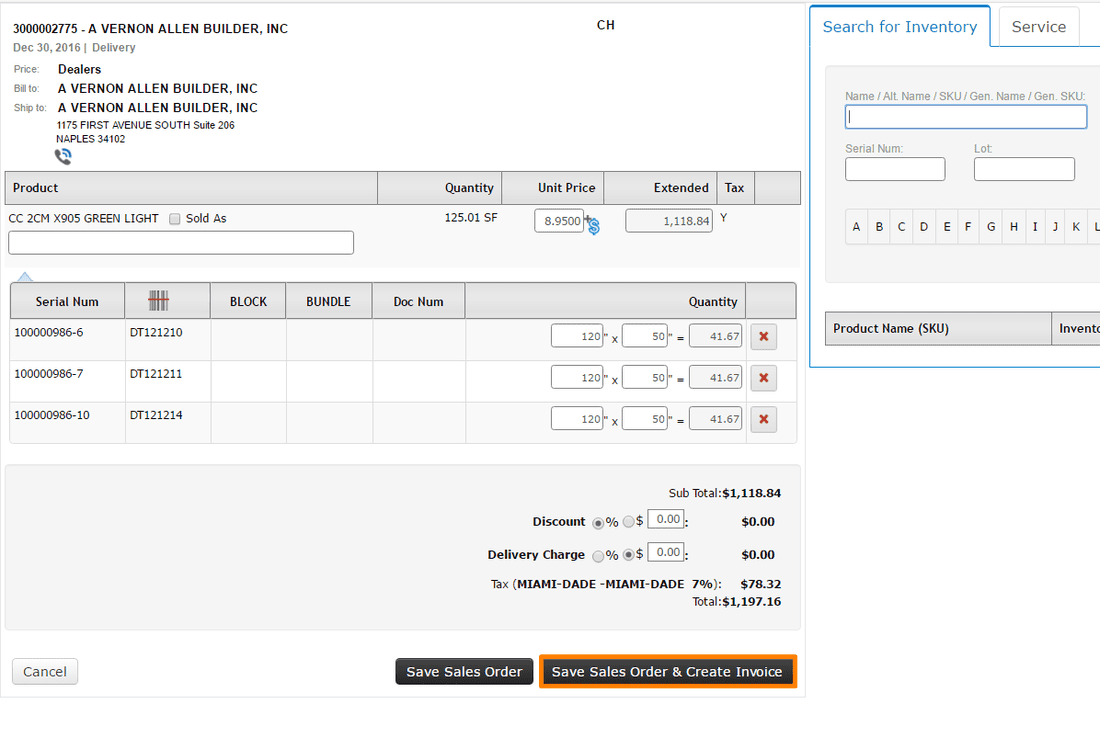
6.) The items selected on the last page should already be populated in your product/service selection screen. Add services or make changes as needed. Then, click the button to "Save Sales Order & Create Invoice" to move the items out of your inventory list and bill the customer. ​
Picture

GLOBAL SEARCH BOX

 
Picture

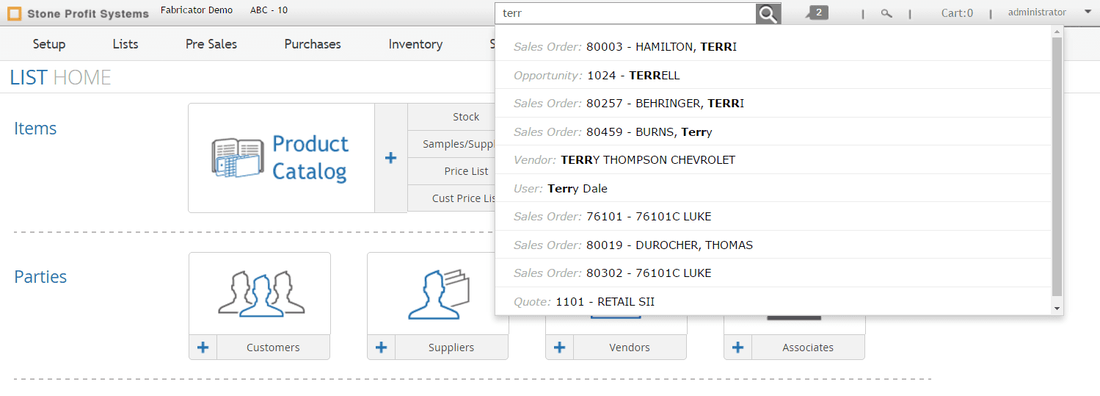
An open text field on the top bar of your system can be used for searching several types of items and transactions at the same time. This search results may include the following: 
  • Sales & Pre-Sales Transactions (Opportunities, Holds, Quotes, Sales Orders)
  • Parties (Customers, Suppliers, Vendors, Associates)
  • Items (Products and Services)
  • Purchasing Transactions (POs and SIPLs)
  • Users (Employees)


​You may enter names, phone numbers, addresses, or transaction numbers in the search. Suggested search results will show up below the search box after partial entry.
Picture


​Simply hover over the desired search result and click to be taken to the detail page for that item/transaction. ​
Picture


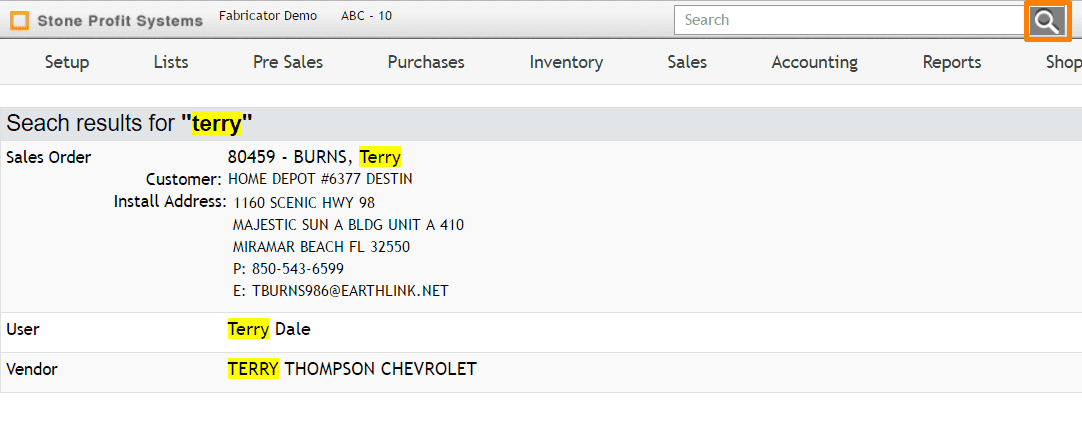
Clicking the magnifying glass button will bring up a full search results page. ​
Picture

ERROR OPENING EXCEL EXPORTS DUE TO WINDOWS UPDATE

 
A security update pushed by Microsoft on July 12th has caused an error when trying to open exported excel documents from websites in Excel versions 2013 and earlier. Stone Profits' excel export function has been affected, and there are steps you will need to take to be able to open excel exports at this time. 

Stone Profit Systems cannot prevent or control updates by Microsoft. This is not an update by Stone Profits.

Please use one of the two methods below to enable viewing/editing excel exports from the internet.
​
METHOD 1
This one-time fix will allow you to be able to open and edit all excel documents exported from websites.

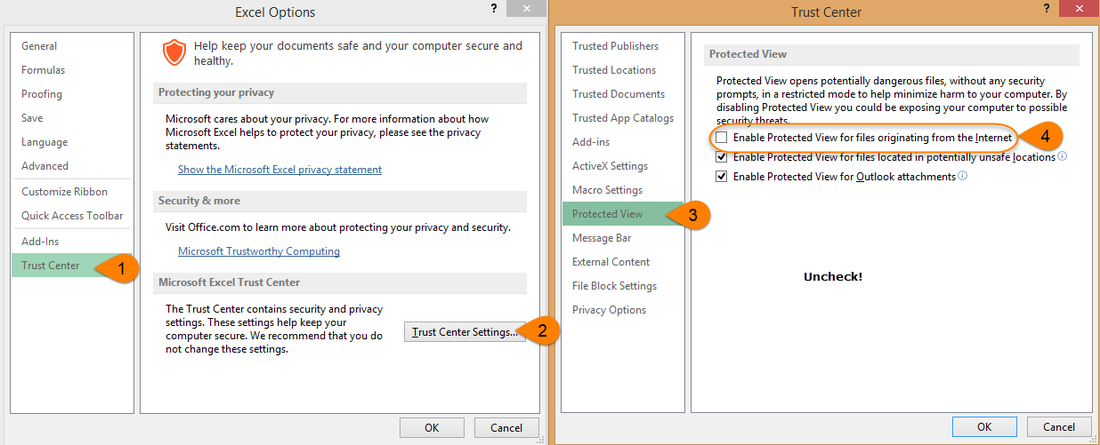
1.) In Excel, click File, then click "Options."

2.) In Excel Options, go to the Trust Center section, then click "Trust Center Settings..." 

3.) Go to the Protected View section, then uncheck the box for "Enable Protected View for files originating from the Internet"
Picture
METHOD 2
This method will allow you to keep your current excel settings the same but allow viewing/editing individual files. 

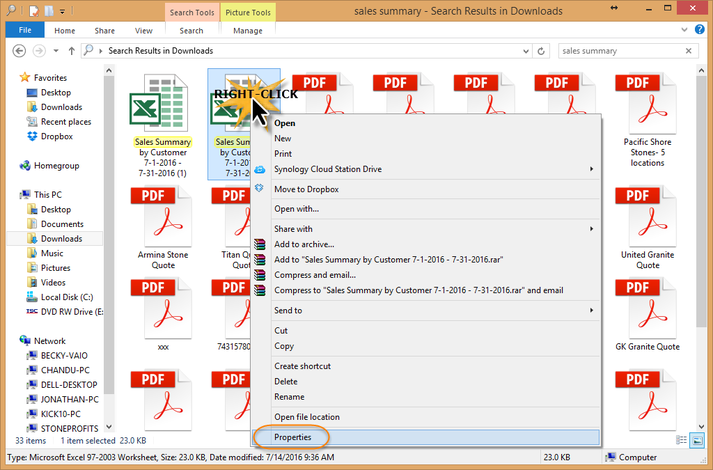
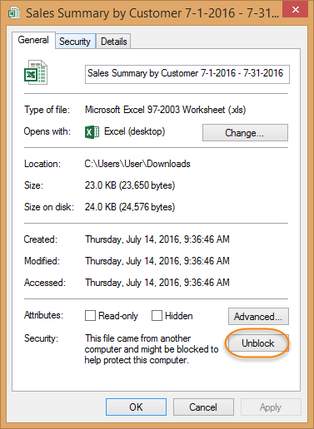
1.) Find the file in your file explorer

2.) Right-click the file, and then click "Properties."

3.) Click to "Unblock" the file
​
Picture
Picture

The Stone Profits development team is exploring ways to potentially by-pass this change in Excel settings to open our exports. A team member will reach out to our contact at your company with updates.